
写在前面
本文是afl-fuzz的源码解读的第三部分也是最后一部分,前面我们已经看到了 afl-fuzz 的初始化配置和第一次 fuzz 的过程,接下来就准备进入到核心的主循环中。
afl-fuzz-3
1. 主循环之前
1. cull_queue
该函数主要是做主循环之前的一个队列精简的工作,其源码如下:
static void cull_queue(void) {

  struct queue_entry* q;
  static u8 temp_v[MAP_SIZE >> 3];
  u32 i;

  if (dumb_mode || !score_changed) return;  // 如果处于dumb模式或者score没有发生变化(top_rated没有发生变化),直接返回

  score_changed = 0;

  memset(temp_v, 255, MAP_SIZE >> 3);
  // 设置temp_v大小为MAP_SIZE>>3,初始化为0xff,全1,表示还没有被覆盖到,为0表示被覆盖到了。

  queued_favored  = 0;
  pending_favored = 0;

  q = queue;

  while (q) { // 进行队列遍历
    q->favored = 0; // 所有元素的favored均设置为0
    q = q->next;
  }

  /* Let's see if anything in the bitmap isn't captured in temp_v.
     If yes, and if it has a top_rated[] contender, let's use it. */

  // i从0到MAP_SIZE进行迭代,筛选出一组队列条目,它们可以覆盖到所有现在已经覆盖的路径
  for (i = 0; i < MAP_SIZE; i++)
    if (top_rated[i] && (temp_v[i >> 3] & (1 << (i & 7)))) {

      u32 j = MAP_SIZE >> 3;

      /* Remove all bits belonging to the current entry from temp_v. */

      // 从temp_v中,移除所有属于当前current-entry的byte,也就是这个testcase触发了多少path就给tempv标记上
      while (j--)
        if (top_rated[i]->trace_mini[j])
          temp_v[j] &= ~top_rated[i]->trace_mini[j];

      top_rated[i]->favored = 1;
      queued_favored++;

      if (!top_rated[i]->was_fuzzed) pending_favored++;

    }

  q = queue;

  while (q) { // 遍历队列,不是favored的case(冗余的测试用例)被标记成redundant_edges
    mark_as_redundant(q, !q->favored); // 位置在/queue/.state/redundent_edges中
    q = q->next;
  }
}


static struct queue_entry *queue,     /* Fuzzing queue (linked list)      */
                          *queue_cur, /* Current offset within the queue  */
                          *queue_top, /* Top of the list                  */
                          *q_prev100; /* Previous 100 marker              */
这里以一个网上公开的例子来理解这个过程。现假设有如下tuple和seed信息:
- tuple: t0, t1, t2, t3, t4
- seed: s0, s1, s2
- 初始化
temp_v = [1,1,1,1,1] - s1可覆盖t2, t3,s2覆盖t0, t1, t4,并且top_rated[0] = s2,top_rated[2]=s1
将按照如下过程进行筛选和判断:
- 首先判断 temp_v[0]=1,说明t0没有被覆盖;
- top_rated[0] 存在 (s2) -> 判断s2可以覆盖的范围 ->
trace_mini = [1,1,0,0,1]; - 更新
temp_v=[0,0,1,1,0], 标记s2为 "favored"; - 继续判断 temp_v[1]=0,说明t1此时已经被覆盖,跳过;
- 继续判断 temp_v[2]=1,说明t2没有被覆盖;
- top_rated[2] 存在 (s1) -> 判断s1可以覆盖的范围 ->
trace_mini=[0,0,1,1,0]; - 更新
temp_v=[0,0,0,0,0],标记s1为 "favored"; - 此时所有tuple都被覆盖,具备"favored'标记的为s1, s2,过程结束。
如果对这个过程还是不是很清楚,可以动态调试的时候看一下中间数据。
2. show_init_stats
该函数主要在处理输入目录的结尾现实一些统计信息:
static void show_init_stats(void) {

  struct queue_entry* q = queue;
  u32 min_bits = 0, max_bits = 0;
  u64 min_us = 0, max_us = 0;
  u64 avg_us = 0;
  u32 max_len = 0;

  if (total_cal_cycles) avg_us = total_cal_us / total_cal_cycles;       // 计算单轮执行的时间,total_cal_cycles和total_cal_us数据来自于calibrate_case

  while (q) {

    if (!min_us || q->exec_us < min_us) min_us = q->exec_us;
    if (q->exec_us > max_us) max_us = q->exec_us;

    if (!min_bits || q->bitmap_size < min_bits) min_bits = q->bitmap_size;
    if (q->bitmap_size > max_bits) max_bits = q->bitmap_size;

    if (q->len > max_len) max_len = q->len;

    q = q->next;

  }

  SAYF("\n");

  if (avg_us > (qemu_mode ? 50000 : 10000))                             // 单轮执行时间如果在非qemu_mode下,超过10000就给出warning
    WARNF(cLRD "The target binary is pretty slow! See %s/perf_tips.txt.",
          doc_path);

  /* Let's keep things moving with slow binaries. */

  if (avg_us > 50000) havoc_div = 10;     /* 0-19 execs/sec   */       // 根据不同的单轮时间设置不同的havoc_div的值
  else if (avg_us > 20000) havoc_div = 5; /* 20-49 execs/sec  */
  else if (avg_us > 10000) havoc_div = 2; /* 50-100 execs/sec */

  if (!resuming_fuzz) {         // 非resuming_session情况下

    if (max_len > 50 * 1024)    // 根据不同的queue的大小和数量超限的情况给出警告
      WARNF(cLRD "Some test cases are huge (%s) - see %s/perf_tips.txt!",
            DMS(max_len), doc_path);
    else if (max_len > 10 * 1024)
      WARNF("Some test cases are big (%s) - see %s/perf_tips.txt.",
            DMS(max_len), doc_path);

    if (useless_at_start && !in_bitmap)   // 如果useless_at_start不为0,提示可以精简样本
      WARNF(cLRD "Some test cases look useless. Consider using a smaller set.");

    if (queued_paths > 100)    // 如果queued_paths大于了100的话,也是让精简样本
      WARNF(cLRD "You probably have far too many input files! Consider trimming down.");
    else if (queued_paths > 20)
      WARNF("You have lots of input files; try starting small.");

  }

  OKF("Here are some useful stats:\n\n"                 // 给出一些统计信息

      cGRA "    Test case count : " cRST "%u favored, %u variable, %u total\n"
      cGRA "       Bitmap range : " cRST "%u to %u bits (average: %0.02f bits)\n"
      cGRA "        Exec timing : " cRST "%s to %s us (average: %s us)\n",
      queued_favored, queued_variable, queued_paths, min_bits, max_bits,
      ((double)total_bitmap_size) / (total_bitmap_entries ? total_bitmap_entries : 1),
      DI(min_us), DI(max_us), DI(avg_us));

  if (!timeout_given) {         // 如果没有设置超时的话,根据不同的情况计算执行的超时时间exec_tmout

    /* Figure out the appropriate timeout. The basic idea is: 5x average or
       1x max, rounded up to EXEC_TM_ROUND ms and capped at 1 second.

       If the program is slow, the multiplier is lowered to 2x or 3x, because
       random scheduler jitter is less likely to have any impact, and because
       our patience is wearing thin =) */

    if (avg_us > 50000) exec_tmout = avg_us * 2 / 1000;
    else if (avg_us > 10000) exec_tmout = avg_us * 3 / 1000;
    else exec_tmout = avg_us * 5 / 1000;

    exec_tmout = MAX(exec_tmout, max_us / 1000);
    exec_tmout = (exec_tmout + EXEC_TM_ROUND) / EXEC_TM_ROUND * EXEC_TM_ROUND;

    if (exec_tmout > EXEC_TIMEOUT) exec_tmout = EXEC_TIMEOUT;

    ACTF("No -t option specified, so I'll use exec timeout of %u ms.",
         exec_tmout);

    timeout_given = 1;

  } else if (timeout_given == 3) {   // 如果设置了超时时间,就直接使用设置的超时时间

    ACTF("Applying timeout settings from resumed session (%u ms).", exec_tmout);

  }

  /* In dumb mode, re-running every timing out test case with a generous time
     limit is very expensive, so let's select a more conservative default. */

  if (dumb_mode && !getenv("AFL_HANG_TMOUT"))           // 如果处于dumb模式并且没有 AFL_HANG_TMPOUT 环境变量的话,设置hang_tmout
    hang_tmout = MIN(EXEC_TIMEOUT, exec_tmout * 2 + 100);

  OKF("All set and ready to roll!");

}
函数的整体流程还是比较简单的,主要就是计算单轮的执行时间、超时时间等信息,然后显式出来。
3. find_start_position
如果处于resuming的情况时,该函数会尝试查找要从其开始的队列位置,而且还要求我们能找到原始的fuzzer_stats。
- 如果不是 resming_fuzz,直接返回;
- 如果是in_place_resume,打开
out_dir/fuzzer_stats文件,否则打开in_dir/../fuzzer_stats文件 - 读取文件内容到tmp[4096]中,找到
cur_path,并设置为ret的值,如果大于queued_paths就设置ret为0,返回ret。
4. write_stats_file
该函数主要是更新统计信息文件以进行无值守monitor:
static void write_stats_file(double bitmap_cvg, double stability, double eps) {
... ...
  u8* fn = alloc_printf("%s/fuzzer_stats", out_dir);   // 获取fd
... ...

  fd = open(fn, O_WRONLY | O_CREAT | O_TRUNC, 0600);   // 600权限打开状态文件

  if (fd < 0) PFATAL("Unable to create '%s'", fn);

  ck_free(fn);

  f = fdopen(fd, "w");                          // 可写权限打开
... ...

  // 开始写入统计信息
  fprintf(f, "start_time        : %llu\n"      // 开始时间
             "last_update       : %llu\n"       // 当前时间
             "fuzzer_pid        : %u\n"         // fuzzer的进程id
             "cycles_done       : %llu\n"       // queue队列被完全变异一次的次数
             "execs_done        : %llu\n"       // target的总的执行次数,执行一次run_target,数值就会+1
             "execs_per_sec     : %0.02f\n"     // 每秒执行的次数
             "paths_total       : %u\n"         // queue队列中的样例总数
             "paths_favored     : %u\n"         // “有价值的”路径总数
             "paths_found       : %u\n"         // 发现的新的queue entry的数目
             "paths_imported    : %u\n"         // 在master-slave模式下,sync过来的case是interesting的,就+1
             "max_depth         : %u\n"         // 最大路径深度
             "cur_path          : %u\n" /* Must match find_start_position() */
             "pending_favs      : %u\n"         // 等待fuzz的facvored路径数
             "pending_total     : %u\n"         // 等待fuzz的case数
             "variable_paths    : %u\n"         // calibrate_case在评估新的test case时,如果case的路径可变,则计数器+1
             "stability         : %0.02f%%\n"
             "bitmap_cvg        : %0.02f%%\n"
             "unique_crashes    : %llu\n"       // 在save_if_interesting时,如fault是FAULT_CRASH,则+1
             "unique_hangs      : %llu\n"       // 如fault是FAULT_TMOUT,则+1
             "last_path         : %llu\n"       // 在add_to_queue是,设置一次last_path_time为当前时间
             "last_crash        : %llu\n"       // last_crash时间更新
             "last_hang         : %llu\n"       // lash_hang时间更新
             "execs_since_crash : %llu\n"       // 在上一次crash时总计执行了多少次
             "exec_timeout      : %u\n" /* Must match find_timeout() */
             "afl_banner        : %s\n"
             "afl_version       : " VERSION "\n"
             "target_mode       : %s%s%s%s%s%s%s\n"
             "command_line      : %s\n"
             "slowest_exec_ms   : %llu\n",
             start_time / 1000, get_cur_time() / 1000, getpid(),
             queue_cycle ? (queue_cycle - 1) : 0, total_execs, eps,
             queued_paths, queued_favored, queued_discovered, queued_imported,
             max_depth, current_entry, pending_favored, pending_not_fuzzed,
             queued_variable, stability, bitmap_cvg, unique_crashes,
             unique_hangs, last_path_time / 1000, last_crash_time / 1000,
             last_hang_time / 1000, total_execs - last_crash_execs,
             exec_tmout, use_banner,
             qemu_mode ? "qemu " : "", dumb_mode ? " dumb " : "",
             no_forkserver ? "no_forksrv " : "", crash_mode ? "crash " : "",
             persistent_mode ? "persistent " : "", deferred_mode ? "deferred " : "",
             (qemu_mode || dumb_mode || no_forkserver || crash_mode ||
              persistent_mode || deferred_mode) ? "" : "default",
             orig_cmdline, slowest_exec_ms);
             /* ignore errors */
  if (getrusage(RUSAGE_CHILDREN, &usage)) {
      WARNF("getrusage failed");
  } else if (usage.ru_maxrss == 0) {
    fprintf(f, "peak_rss_mb       : not available while afl is running\n");
  } else {
    ... ...
    fprintf(f, "peak_rss_mb       : %zu\n", usage.ru_maxrss >> 10);
    ... ...
  }

  fclose(f);

}
该函数主要是看打印的几个参数都是怎么计算的,这些参数也是 afl 的界面中显示的各种信息。中间会涉及到一些函数暂时还没有写到,后续会跟进。
阶段总结
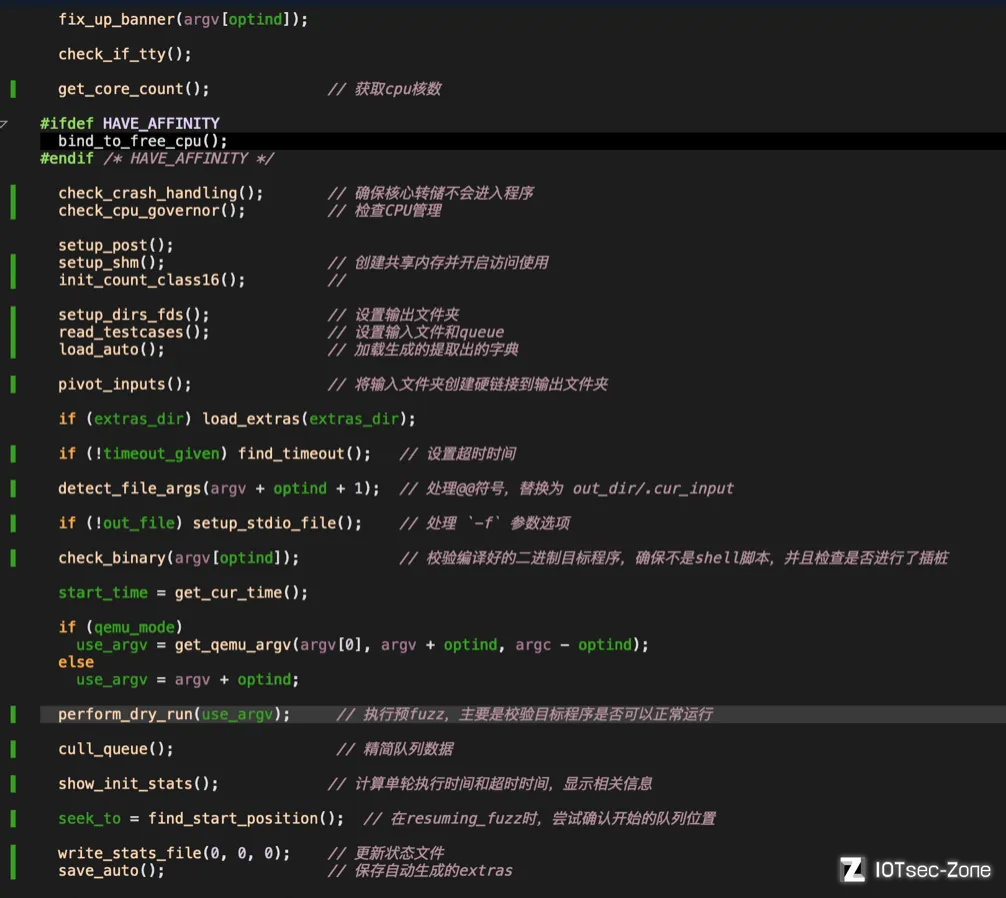
截止到目前为止,afl完成了进入主循环之前的配置工作,再来回顾一下涉及的流程:
2. 主循环
在完成前面的环境准备工作和输入校验后,接下来就进入一个 while 循环,这个循环是 afl-fuzz.c 的一个实现fuzz的主循环,源码如下:
  // 进入主循环
  while (1) {

    u8 skipped_fuzz;

    cull_queue();       // 首先精简队列

    if (!queue_cur) {   // 首先判断当前队列是否为空,为空表示所有的queue都执行完一轮了

      queue_cycle++;    // 所有queue的轮次计数器+1
      current_entry     = 0;    // 设置entry为0.准备开始新一轮fuzz
      cur_skipped_paths = 0;
      queue_cur         = queue;        // 设置为queue首元素

      while (seek_to) { // 这里判断是不是resume fuzz的情况,如果是检查seek_to是否为空,不为空的话就从seek_to指定的queue元素开始执行
        current_entry++;
        seek_to--;
        queue_cur = queue_cur->next;
      }

      show_stats();     // 刷新展示界面
... ...

      if (queued_paths == prev_queued) {        // 这里是判断一轮执行后的queue的case数量和执行之前一样的话,表示这一轮执行没有发现新的case

        if (use_splicing) cycles_wo_finds++; else use_splicing = 1;  // 使用splice重组queue中的case

      } else cycles_wo_finds = 0;

      prev_queued = queued_paths;

      if (sync_id && queue_cycle == 1 && getenv("AFL_IMPORT_FIRST"))    // 在Master-Slave模式下时,进行case同步
        sync_fuzzers(use_argv);

    }

    skipped_fuzz = fuzz_one(use_argv);  // 执行一次fuzz,成功返回0,如果是跳过fuzz或其他失败情况返回1

    // 如果出现用户取消fuzz的情况
    if (!stop_soon && sync_id && !skipped_fuzz) {

      if (!(sync_interval_cnt++ % SYNC_INTERVAL))
        sync_fuzzers(use_argv);
    }

    if (!stop_soon && exit_1) stop_soon = 2;

    if (stop_soon) break;  // 如果ctrl + c,直接退出循环,结束fuzz

    queue_cur = queue_cur->next;  // 获取下一个case
    current_entry++;              // entry + 1
  }
整体的流程如下:
- 判断
queue_cur是否为空,如果是则表示已经完成队列遍历,初始化相关参数,重新开始一轮; - 找到queue入口的case,直接跳到该case;
- 如果一整个队列循环都没新发现,尝试重组策略;
- 调用函数
fuzz_one()对 case进行 fuzz; - 再对队列的下一个case 进行 fuzz。队列中的所有 case 都完成一轮之后,就完成了一个 ”cycle”,就是AFL状态栏右上角的 ”cycles done”。然后,整个队列又会从第一个文件开始,再次进行变异fuzz。与第一次不同的是,这一次不再进行 “deterministic fuzzing” 了。
fuzz_one
这是实际完成 "fuzz" 功能的关键函数,总代码量超1k多行,主要承担了变异的测试的工作,里面包含了多个变异阶段和策略。(由于该函数的代码量较大,我们这里只贴出一部分关键代码,强烈建议大家仔细阅读源码。)
函数的整体过程如下:
-
根据是否有
pending_favored和queue_cur的情况,按照概率进行跳过;有pending_favored, 对于已经fuzz过的或者non-favored的有99%的概率跳过;无pending_favored,95%跳过fuzzed&non-favored,75%跳过not fuzzed&non-favored,不跳过favored;if (pending_favored) { if ((queue_cur->was_fuzzed || !queue_cur->favored) && UR(100) < SKIP_TO_NEW_PROB) return 1; // 已经被fuzz过或者不是favored的 } else if (!dumb_mode && !queue_cur->favored && queued_paths > 10) { if (queue_cycle > 1 && !queue_cur->was_fuzzed) { // 轮次大于1且没有被fuzz过 if (UR(100) < SKIP_NFAV_NEW_PROB) return 1; } else { if (UR(100) < SKIP_NFAV_OLD_PROB) return 1; // 已经被fuzz过 } } -
假如
queue_cur有校准错误,并且校准错误次数小于3次,那么就用calibrate_case进行 case 校准;if (queue_cur->cal_failed < CAL_CHANCES) { queue_cur->exec_cksum = 0; res = calibrate_case(argv, queue_cur, in_buf, queue_cycle - 1, 0); ... ... } -
如果case 没有进行过修剪(queue_cur->trim_done = 0),那么调用函数
trim_case对queue_cur进行修剪;u8 res = trim_case(argv, queue_cur, in_buf); -
修剪完毕之后,使用
calculate_score对queue_cur进行打分;orig_perf = perf_score = calculate_score(queue_cur); -
如果该queue已经完成deterministic阶段,则直接跳到havoc阶段;
if (skip_deterministic || queue_cur->was_fuzzed || queue_cur->passed_det) goto havoc_stage; if (master_max && (queue_cur->exec_cksum % master_max) != master_id - 1) goto havoc_stage; -
deterministic阶段变异4个stage,变异过程中会多次调用函数common_fuzz_stuff函数,保存interesting 的种子:
- bitflip,按位翻转,1变为0,0变为1
- arithmetic,整数加/减算术运算
- interest,把一些特殊内容替换到原文件中
- dictionary,把自动生成或用户提供的token替换/插入到原文件中
- havoc,中文意思是“大破坏”,此阶段会对原文件进行大量变异。
- splice,中文意思是“绞接”,此阶段会将两个文件拼接起来得到一个新的文件。
-
该轮完成。
我们暂时没有对变异部分进行详细分析,这里感兴趣的小伙伴可自行探索。
trim_case
该函数主要是对测试用例进行校验时,会修剪所有新的测试用例来节省fuzz 周期。
- 首先取 case 长度 2 的指数倍;
- 第一个while循环,从文件大小1/16的步长开始,慢慢到文件大小的1/1024倍步长。
- 第二个while循环,嵌套在第一个内,从文件头开始按步长修剪case,然后
target_run();如果删除之后对文件执行路径没有影响那么就将这个删除保存至实际文件中。再删除之前会将trace_bits保存到起来。删除完成之后重新拷贝。
如果相对 afl 如何进行文件修剪进行更深入的研究,我建议大家去看 afl-trim 工具的源码,它使用了更详尽的迭代算法,并且尝试在修剪过的文件上执行字母标准化。
calculate_score
根据case的执行速度、bitmap的大小、case产生时间、路径深度等因素给case进行打分,返回值为一个分数,用来调整在havoc阶段的用时。使得执行时间短、代码覆盖高、新发现的、路径深度深的case拥有更多havoc变异的机会。
common_fuzz_stuff
编写修改后的测试用例,运行程序,处理结果。处理错误条件,如果需要退出,返回1。它其实就是写入文件并执行,然后处理结果,出错就返回1。
- write_to_testcase() 将变异写到文件中;
- run_target() ;
- save_if_interesting() 判断一个文件是否为interesting种子,如果是那么就保存输入文件(queue)。
sync_fuzzers
读取其他 sync 文件夹下的 queue文件到自己的queue中,具体过程是先读取有哪些fuzzer文件夹,然后读取其他fuzzer文件夹下的queue文件夹里的case,并依次执行,如果发现了新path,就保存到自己的queue文件夹里,而且将最后一个sync的case id写入到.synced/其他fuzzer文件夹名文件里,以避免重复运行。
3. 主循环后
上面的 fuzz 循环结束后,后续的流程就是处理 fuzz 的结果,然后进行一些清理工作:
- write_bitmap: 将 bitmap 信息写入到
out_dir/fuzz_bitmap文件中,主要是在使用 -B 选项时使用。 - write_stats_file(0,0,0): 更新统计信息
- save_auto: 保存生成的 extras
- destroy_queue:destroy 整个 queue
- destroy_extras:destroy 所有的 extras
阶段总结
到这里为止,我们对 afl-fuzz.c 文件的源码分析也就结束了,其中略过了一些不属于 fuzz 过程关键点(个人认为)的内容,比如变异策略部分。其实最关键的函数是 perform_dry_run()、fuzz_one() 这两个函数,对于前期的初始化设置阶段和后来的结果处理阶段,本质上并没有特别需要关注的地方,属于一个工具的常规内容。如果我们想尝试去改进或定制 afl,可能根据需要去修改变异策略、输入读取等内容即可,而对于队列和共享内存的处理,如果没有特别的性能需求,可以直接使用原生代码即可。对于覆盖率部分,则是更强调工具优化。


